Ultimate Guide to False Lashes: Choose, Apply & Remove
Anúncios
Achieve captivating eyes by mastering the art of false lashes, from selecting the perfect style to precise application and gentle removal, ensuring a flawless and comfortable enhancement for any look.
False lashes have become an indispensable tool in elevating any makeup look, transforming subtle enhancements into dramatic statements. This comprehensive guide, The Ultimate Guide to False Lashes: How to Choose, Apply, and Remove Them, aims to demystify the process, ensuring a seamless and stunning application every time.
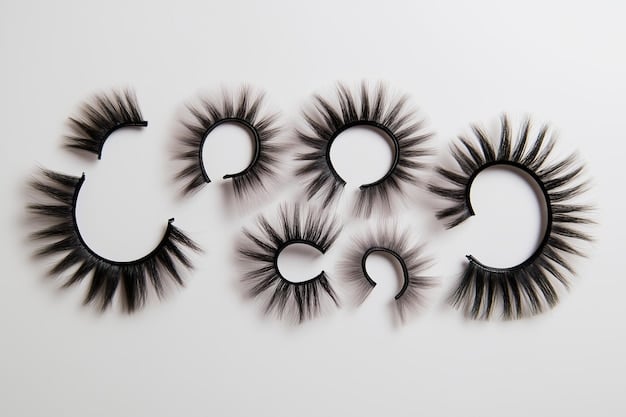
Understanding False Lash Types and Materials
Diving into the world of false lashes can feel overwhelming given the sheer variety available. However, understanding the different types and materials is the first step towards choosing the perfect pair to complement your eyes and desired aesthetic. Each type offers a unique look and feel, catering to various occasions and preferences.
From individual clusters to full strips, and from synthetic fibers to luxurious mink, the options seem endless. Selecting the right lash goes beyond just aesthetics; it also involves considering durability, reusability, and ethical sourcing. A well-informed choice can significantly enhance your comfort and the overall impact of your makeup.
Strip Lashes: The Everyday Go-To
Strip lashes are the most common and arguably the easiest form of false eyelashes to apply, making them a popular choice for both beginners and experienced users. They come on a pre-measured band that is applied along the natural lash line, instantly adding volume and length. This type is ideal for quick transformations and can dramatically alter a look with minimal effort.
- Natural Look: Subtle, wispy lashes for daily wear.
- Dramatic Flair: Fuller, longer lashes for special events or night outs.
- Ease of Use: Simple application and removal process.
Individual Lashes: Precision and Customization
Individual lashes, also known as flares or clusters, offer unparalleled customization. Instead of a full strip, these are small groups of lashes or single strands applied one by one to fill in sparse areas or add precise volume where needed. They blend seamlessly with natural lashes, creating a more personalized and often more subtle enhancement.
While individual lashes require more time and precision to apply, their ability to create a truly bespoke look is unmatched. They are perfect for achieving a feathered, natural appearance or for selectively emphasizing certain parts of the lash line, offering flexibility that strip lashes can’t match. Their lightweight nature often makes them feel more comfortable for extended wear.
Magnetic Lashes: Innovation in Application
Magnetic lashes represent a relatively new and exciting innovation in the false lash market. Unlike traditional lashes that require adhesive, these lashes come with tiny magnets on the band that adhere to a magnetic eyeliner applied along the lash line. This method eliminates the need for messy glues, making application quicker and less irritating for sensitive eyes.
There are also magnetic lash systems that use two strips of lashes – one placed above and one below your natural lashes, sandwiching them together with magnets. This can provide a secure hold without any product on the skin. Magnetic lashes are gaining popularity for their ease of use and reusability, offering a convenient alternative for those seeking a fuss-free lash experience.
Understanding these fundamental types of false lashes provides a solid foundation for making informed decisions. Each type caters to different needs and skill levels, ensuring that there’s an option for everyone looking to enhance their eye makeup with a touch of artificial elegance.
Choosing the Right False Lashes for Your Eye Shape
Selecting the ideal false lashes is not just about personal preference; it’s also about harmonizing them with your unique eye shape. Just as a well-tailored dress enhances one’s figure, the right lash style can accentuate your eyes, making them appear larger, more defined, or more alluring. Understanding your eye shape is key to unlocking the full potential of false lashes.
Different lash styles are designed to complement specific eye contours, addressing common concerns like droopy lids or small eyes, and enhancing natural assets like prominent almond eyes. A mismatched lash can sometimes overshadow rather than uplift, so a thoughtful approach to selection is highly recommended.
Almond Eyes: Versatility is Key
Almond eyes, characterized by their oval shape and slightly upturned outer corners, are considered the most versatile eye shape. Almost any lash style will flatter almond eyes, making them easy to enhance. However, styles that are slightly shorter in the inner corner and gradually lengthen towards the outer corner tend to look particularly stunning, amplifying their natural lift without overwhelming them.
Round Eyes: Elongate and Lift
Round eyes tend to appear wide open, offering a youthful and expressive look. The goal with false lashes for round eyes is often to elongate them and create a more almond-like appearance. Styles with more length and volume at the outer corners, or those with varied lengths that create a cat-eye effect, work best. This helps to extend the eye horizontally, balancing their natural roundness.
- Winged Styles: Emphasize outer corners for an elongated look.
- Fluttery Lashes: Add a soft, feathery appearance without increasing roundness.
- Avoid Heavy Styles: Too much volume can make eyes appear even rounder.
Hooded Eyes: Define and Open Up
Hooded eyes feature a fold of skin that partially covers the eyelid crease, sometimes making the eyes appear smaller. For hooded eyes, the best false lashes are those that provide lift and dimension without being too heavy. Lashes with a significant curl and longer lengths in the center can help to open up the eyes, creating the illusion of a more visible lid space.
Avoiding overly dense or long lashes can prevent them from brushing against the brow bone, which can be uncomfortable and obscure the eyes further. A good rule of thumb is to choose lashes that are noticeable but not overpowering, allowing both the eyes and the lashes to shine.
Monolid Eyes: Add Depth and Curl
Monolid eyes, common in East Asian populations, lack a visible crease and tend to be flatter on the surface. The aim for monolid eyes is to add depth, dimension, and curl. Lashes with a strong curl and a graduated length, with shorter inner corners and longer outer corners, are often most flattering. This style provides lift and helps to create a more defined lash line.
Selecting lashes that are too sparse or too straight may not provide enough impact, while overly dense lashes might look too heavy. A well-chosen false lash can beautifully enhance monolid eyes, adding an elegant touch without overwhelming their natural beauty.
By taking your specific eye shape into consideration, you elevate your false lash game from a simple application to a strategic enhancement. This thoughtful approach ensures that your lashes not only look good but also beautifully complement and accentuate your natural features, making your eyes truly pop.
Essential Tools and Preparation for Application
Successful false lash application hinges not only on choosing the right lashes but also on having the proper tools and adequately preparing your natural lashes. A well-equipped toolkit and a prepared base make the process smoother, more precise, and ultimately, result in a more flawless finish. Rushing the preparation can lead to frustration and a less than perfect outcome.
Think of it like painting a masterpiece; you wouldn’t start without good brushes and a primed canvas. Similarly, for false lashes, careful preparation ensures that the lashes adhere correctly, blend seamlessly, and remain comfortable throughout wear. This foundational step is often overlooked but is crucial for a professional-looking result.
Must-Have Tools for Flawless Application
Having the right implements can significantly simplify the application process. While some false lash kits come with basic tools, investing in quality accessories can make a world of difference, especially for beginners. These tools provide control and precision, minimizing common application mishaps like crooked lashes or excessive glue.
- Lash Applicator or Tweezers: Essential for precise placement and handling of delicate lashes.
- Eyelash Adhesive/Glue: Choose a reputable, fast-drying, and waterproof formula, preferably latex-free if you have sensitivities.
- Small Scissors: For trimming lashes to fit your eye length perfectly.
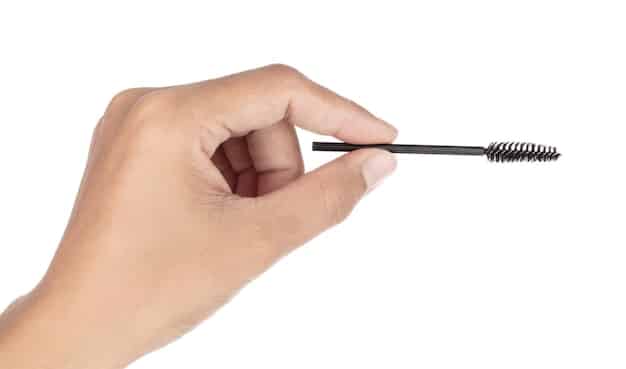
- Eyelash Curler: To curl natural lashes, helping them blend seamlessly with false ones.
- Mascara: To coat natural lashes before application, aiding in blending and hold.
Each tool plays a vital role in ensuring a smooth and successful application. From trimming to curling, every step contributes to the final, polished look. Do not underestimate the power of good tools; they are the unsung heroes of lash application.
Prepping Your Natural Lashes
Before even touching your false lashes, your natural lashes need to be prepped. This involves cleaning, curling, and applying a light coat of mascara. Proper preparation ensures that the false lashes have a clean base to adhere to, and that they blend naturally with your own, avoiding a disjointed appearance.
Start by ensuring your eyelids and natural lashes are clean and free of any oil or makeup residue. Oily surfaces can prevent the adhesive from bonding effectively, leading to premature lifting of the false lashes. A gentle, oil-free cleanser can be used, followed by ensuring the area is completely dry.
Next, curl your natural lashes with an eyelash curler. This step is crucial because it lifts your lashes, allowing the false lashes to sit comfortably on top without pointing downwards. It also creates a cohesive curve between your natural and artificial lashes, making them appear as one cohesive unit.
Finally, apply a light coat of mascara to your natural lashes. This provides a “grip” for the false lashes to adhere to and also helps to darken your natural lashes, ensuring they don’t look visibly lighter or less voluminous than the false ones. Opt for a non-waterproof mascara for easier removal later. Remember, a clean, curled, and lightly coated base is the secret to a professional and long-lasting false lash application.
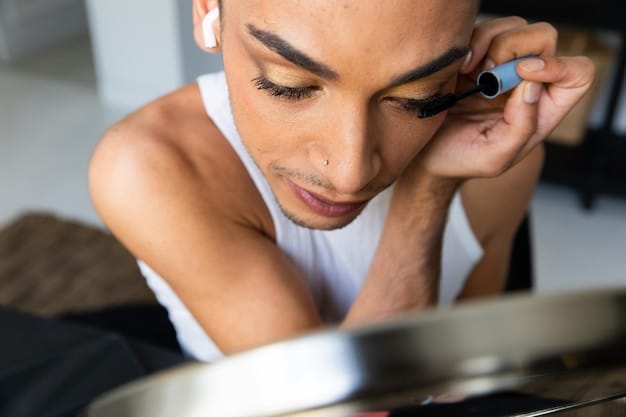
Step-by-Step Guide to Applying False Lashes
Applying false lashes, especially for beginners, can seem daunting. However, with a methodical, step-by-step approach and a bit of practice, you can master the technique. Patience and precision are key to achieving a flawless finish that enhances your eyes beautifully. Rushing through the process often leads to crooked lashes or visible glue, detracting from the desired effect.
This section will walk you through each stage, from preparing the lash to final adjustments, ensuring you have all the necessary information to achieve a professional application at home. Remember, like any skill, practice makes perfect.
1. Measure and Trim for a Perfect Fit
The first and most critical step is to measure the false lash against your natural lash line. Not all false lashes come trimmed to size, and wearing a lash that is too long for your eye can cause discomfort and look unnatural. Hold the lash against your eyelid, aligning the inner corner of the false lash with the point where your natural lashes begin.
Use small, sharp scissors to carefully trim any excess from the outer corner of the false lash. Never trim from the inner corner, as this part is designed to be shorter and tapered to blend more naturally with your eye’s inner kant. A perfectly measured lash will sit comfortably without poking or lifting at the ends, which is essential for both aesthetics and comfort.
2. Apply a Thin Layer of Adhesive
Once trimmed, apply a thin, even layer of lash adhesive along the band of the false lash. Allow the adhesive to become tacky before application. This “drying” time, typically 30-60 seconds, is crucial; applying the lash when the glue is too wet will cause it to slide around, making precise placement difficult and messy. The glue should look translucent or semi-clear before you apply the lash.
Holding the lash by the band (not the lashes themselves), apply the glue from one end to the other, ensuring complete coverage. Pay extra attention to the very ends of the band, as these are the areas most prone to lifting during wear. A small dot of glue on each end can provide extra security.
3. Position and Adhere the False Lash
Using a lash applicator or tweezers, carefully place the false lash onto your eyelid, as close to your natural lash line as possible. The goal is to apply it directly on top of your natural lashes, not on the skin of your eyelid above them. Start by placing the center of the lash first, then gently press down the inner and outer corners.
Applying the lash from the center first gives you more control and allows for easier adjustments. Once positioned, gently press along the entire lash band to ensure it’s firmly secured. You can use the rounded end of your tweezers or even your clean fingertip to press the band into your natural lash line, creating a seamless bond.
4. Blend and Finalize the Look
After the lash is securely in place, allow the adhesive to dry completely. Once dry, you can use an eyelash curler to gently clamp your natural and false lashes together, further blending them. Be very gentle during this step to avoid dislodging the false lash. A final coat of mascara (optional) can also help to marry the two lash sets together, creating a unified and fuller appearance.
- Check for Gaps: Ensure no natural lashes are sticking out below the false ones.
- Eyeliner Touch-Up: Use liquid eyeliner to fill any gaps between the false lash band and your natural lash line.
- Gentle Adjustments: Make minor adjustments only after the glue has partially set, not when it’s still wet.
Mastering these steps takes practice, but the payoff is beautifully enhanced eyes that complete any makeup look. With patience and the right technique, you’ll be applying false lashes with confidence and ease.
Maintaining and Caring for Your False Lashes
Proper maintenance and care are crucial for extending the lifespan of your false lashes, ensuring they remain hygienic and retain their beautiful shape for multiple wears. Neglecting to clean and store them correctly can lead to bacterial buildup, loss of shape, and a sticky residue that makes reapplication difficult.
Just as you care for your makeup brushes, your false lashes deserve attention. With a few simple steps, you can keep them looking pristine and ready for your next glamorous occasion, saving you money and ensuring the best possible application every time. This diligence not only preserves the lashes but also protects your eye health.
Gentle Removal: The First Step to Longevity
The cardinal rule of false lash care begins with gentle removal. Tugging or ripping lashes off can damage both the false lash band and your natural lashes. Always use an oil-based makeup remover to dissolve the lash adhesive. This softens the glue, allowing the false lashes to lift away easily and without resistance.
Apply a small amount of oil-based remover to a cotton swab and gently run it along the lash band. Allow the remover to sit for 30-60 seconds, giving it time to break down the adhesive. Then, starting from the outer corner, gently peel the false lash away from your eyelid. If there’s any resistance, apply more remover and wait a little longer. Patience is key here.
Cleaning Your False Lashes for Reusability
After gently removing your false lashes, the next step is to clean them thoroughly to remove any adhesive residue, mascara, or eyeliner. This process is vital for hygiene and to maintain the integrity of the lash band and fibers. Neglecting this step will make future applications much more difficult and less comfortable.
- Remove Excess Glue: Using your fingers or tweezers, gently peel off any dried adhesive left on the lash band.
- Gentle Wash: Place lashes on a clean surface (like a paper towel) and gently swab the lash band and fibers with a Q-tip dipped in oil-free makeup remover or micellar water.
- Rinse (Optional): For synthetic lashes, a quick, gentle rinse under cool water can help remove product residue, but avoid submerging mink lashes.
Ensure that all makeup and glue residue are removed without causing any damage to the delicate lash fibers. This careful cleaning routine not only keeps your lashes looking new but also prevents potential eye irritations from old makeup or bacteria.
Storing Your Lashes Properly
Once clean and dry, proper storage is essential to help your false lashes retain their original shape and prevent damage. Never leave them loose in your makeup bag, where they can get crushed, bent, or accumulate dust and debris. The original lash tray or a dedicated lash case is the best place to keep them.
Storing false lashes back in their original contoured tray ensures they maintain their curve, which makes reapplication easier. If the original tray is unavailable, a clean, airtight container or a specialized lash case can also work. Always ensure lashes are completely dry before storing to prevent any bacterial growth. With diligent care, a good pair of false lashes can be worn many times, making them a cost-effective and beautiful addition to your beauty routine.
Troubleshooting Common False Lash Issues
Even with careful preparation and application, false lash mishaps can occur. From lashes lifting at the corners to an uncomfortable fit, encountering issues is a normal part of the learning curve. Knowing how to troubleshoot these common problems can save you frustration and ensure your false lash game remains strong, even when things don’t go perfectly initially.
Identifying the root cause of the problem is the first step towards a quick and effective solution. Often, a minor adjustment or a change in technique is all that’s needed to correct a stubborn lash. Don’t be discouraged by initial setbacks; every experienced false lash wearer has faced these challenges.
Lashes Lifting at the Corners
One of the most frequent complaints is false lashes lifting at either the inner or outer corners. This is usually due to insufficient glue application at the ends or not allowing the adhesive to become tacky enough before placement. The ends are often the first points of contact and need the most secure adhesion.
To prevent this, always apply an extra small dot of adhesive to the very ends of the lash band after you’ve applied the main thin layer. Let it sit for that crucial 30-60 seconds until it’s tacky. When applying, ensure you press down firmly on the inner and outer corners for a few extra seconds to create a strong bond. If a lift occurs during wear, a tiny dot of fresh lash glue on a toothpick can be used to re-secure the loose section.
False Lashes Feeling Uncomfortable or Heavy
Discomfort from false lashes often stems from two main issues: an improperly trimmed lash or a lash band that is too thick or stiff for your eye shape. A lash that is too long will poke the inner corner of your eye, while a band that’s not flexible enough can feel rigid and unpleasant.
Always measure and trim your lashes carefully before applying any adhesive. If the entire lash feels too long, trim from the outer corner, little by little, until it fits comfortably without extending past your natural lash line. If the discomfort is due to a stiff band, gently flex the lash band several times before applying glue to make it more pliable. Opting for lashes with thinner, more flexible bands can also significantly improve comfort for future applications.
Visible Glue or Messy Application
Visible glue or a messy application are common tell-tale signs of false lashes. This usually happens when too much adhesive is used or the glue hasn’t dried clear. For a seamless look, less is often more when it comes to lash glue, and patience is key for drying time.
Apply only a thin, even layer of adhesive. Avoid globbing it on. Ensure you allow the glue to become tacky and transparent (or at least semi-transparent) before placing the lash on your eye. If some glue squeezes out during application, wait for it to dry and become clear. Once dry, any minor mistakes can often be camouflaged with a thin line of liquid eyeliner applied directly over the lash band. This helps to blend the lash seamlessly into your natural lash line and effectively hides any unsightly glue residue.
Advanced Techniques and Tips for False Lashes
Once you’ve mastered the basics of choosing, applying, and caring for false lashes, you might want to explore advanced techniques to further elevate your lash game. These tips go beyond standard application, offering ways to achieve even more personalized, secure, and professional-looking results. They are about refining your skills and experimenting with different approaches to truly make your eyes pop.
These advanced methods can address specific aesthetic goals or provide solutions for common challenges, ensuring your lashes not only look stunning but also feel comfortable and last throughout the day or night. It’s about turning a beauty routine into an art form.
Stacking Lashes for Enhanced Volume
For those seeking extreme volume and drama that a single pair of lashes can’t provide, stacking lashes is an excellent advanced technique. This involves layering two different pairs of false lashes to create a custom, super-voluminous look. It’s a favorite among makeup artists for editorial shoots or special events.
Typically, you’d start with a fuller, more natural-looking base lash and then layer a more dramatic or wispy lash on top. The key is to apply the first lash, let it dry completely, and then carefully apply the second lash directly on top of the first, ensuring their bands align perfectly. This method creates incredible density and texture, making your eyes truly stand out, offering a much more impactful look than a single pair might provide.
Under-Lashing for a More Natural Feel
While most people apply false lashes on top of their natural lash line, under-lashing (or “reverse lashing”) involves placing the false lashes underneath your natural lashes. This technique can feel more comfortable and create a remarkably natural look, as the band is completely hidden by your own lashes, giving the illusion that the length and volume are entirely yours.
This method works best with thinner-banded lashes. Apply a small amount of adhesive to the top of the false lash band, then, using tweezers, carefully place the false lash directly underneath your natural lashes, pressing the band upwards against your waterline. This technique requires practice but can yield incredibly seamless and natural-looking results, often providing superior comfort for extended wear.
Customizing Lashes with Trimming and Sectioning
Beyond simply trimming for length, advanced lash users often customize their lashes by cutting them into smaller sections or altering their shape. This technique is particularly useful for achieving specific effects, like a subtle outer corner flick or to make very long lashes more wearable for everyday looks.
- Sectioning Full Strips: Cut a full strip lash into two or three segments. Applying these smaller sections individually can make application easier and offer more control, especially for beginners or those with tricky eye shapes.
- Creating Half Lashes: Trim a full lash to create a “half lash” for a subtle outer corner enhancement, mimicking a cat-eye or providing a gentle lift.
- Alternating Lengths: Mix and match individual lashes of different lengths along your lash line for a truly custom and natural-looking gradient.
Customizing your false lashes allows for unparalleled creativity and precision, transforming standard lashes into a tailor-fit enhancement. These advanced tips enable you to move beyond basic application, providing the tools to experiment and perfect your unique lash aesthetic, making every application a statement of personal style and comfort.
| Key Point | Brief Description |
|---|---|
| 👁️ Lash Types | Understand strip, individual, and magnetic lashes for varied looks. |
| 📐 Eye Shape Match | Choose lashes based on almond, round, hooded, or monolid eyes to enhance. |
| 🛠️ Application Tools | Utilize applicators, adhesive, and scissors for precise, easy application. |
| 🧼 Care & Removal | Gentle removal and cleaning extend lash life for multiple wears. |
Frequently Asked Questions About False Lashes
With diligent and gentle care, including careful removal, thorough cleaning, and proper storage, a good quality pair of strip false lashes can often be reused between 10 to 20 times. Individual lashes might last for a single event if applied with temporary glue, or for 2-3 weeks if applied professionally with stronger adhesive.
Look for a reputable, fast-drying, and waterproof lash adhesive. If you have sensitive eyes or allergies, opt for a latex-free formula to prevent irritation. Always perform a patch test on a small area of skin before applying it directly to your eyelids to check for any adverse reactions.
False lashes generally do not damage natural eyelashes when applied and removed correctly. The key is gentle handling. Avoid pulling or tugging at your natural lashes during application or removal. Using an oil-based remover to dissolve the adhesive is crucial to prevent breakage or loss of your natural lashes.
While you can apply a light coat of mascara to your natural lashes before applying false ones to help them blend, it’s generally not recommended to apply mascara directly onto false lashes after they’re on. Mascara can clump the delicate fibers, reduce their reusability, and make them harder to clean effectively, shortening their lifespan.
To achieve a natural look, choose lashes that mimic the density and varied lengths of real lashes. Avoid overly long or thick styles. Trim the lash to fit your eye perfectly, and apply it as close to your natural lash line as possible. A thin line of eyeliner over the lash band can help blend it seamlessly, making them appear more natural.
Conclusion
Mastering the art of false lashes is a journey that transforms your makeup routine, offering endless possibilities for enhancing your natural beauty. From understanding the diverse types and their suitability for different eye shapes to precise application techniques and diligent aftercare, each step contributes to a flawless and comfortable experience. The confidence that comes with perfectly applied lashes is undeniable, elevating a subtle everyday look or completing a dramatic evening ensemble. As with any skill, patience and practice are your greatest allies, ensuring that each application brings you closer to lash perfection. Embrace the versatility and transformative power of false lashes, and enjoy the captivating gaze they create. With the right tools, knowledge, and a commitment to gentle care, your false lashes will become a cherished and effective part of your beauty arsenal.


