Contouring 101: Master Face Sculpting with Easy Techniques
Anúncios
Achieving a sculpted look with contouring involves understanding facial anatomy, selecting appropriate products, and mastering blending techniques to enhance natural features for a sophisticated finish.
Unlocking the secrets of professional makeup application doesn’t have to be daunting. One of the most transformative techniques in a makeup artist’s repertoire is contouring, a strategic play of light and shadow designed to enhance and define your facial structure. This guide, Contouring 101: Sculpt Your Face Like a Pro with These Easy Techniques, will demystify the art of contouring, providing you with actionable insights and simple steps to achieve a beautifully sculpted look.
understanding the basics of contouring
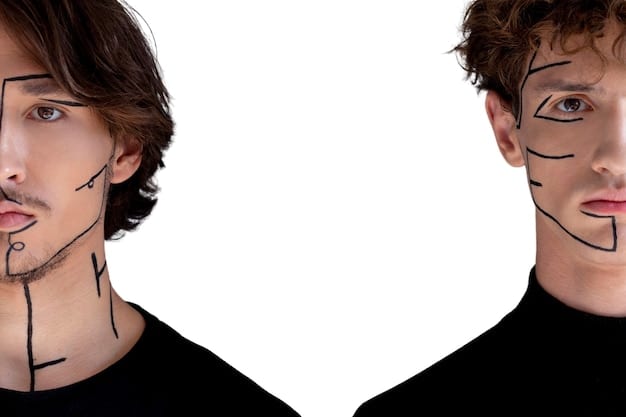
Contouring is essentially an optical illusion, using darker shades to create shadows and lighter shades to bring forward and highlight features. The goal is not to mask your face, but rather to enhance your natural bone structure, adding dimension and definition. Think of it as painting with light and dark, strategically placed to sculpt and refine.
Before diving into application, it’s crucial to grasp the foundational principles. Success in contouring lies in selecting the right products and tools, understanding your face shape, and mastering the art of blending. Without these pillars, even the most expensive products might fall short of delivering the desired sculpted effect.
The Science Behind the Illusion
At its core, contouring manipulates how light interacts with your face. Darker shades absorb light, making areas appear to recede or look more hollow, while lighter shades reflect light, bringing areas forward and making them appear more prominent. This interplay creates depth and definition, allowing you to reshape your features subtly without surgical intervention.
- Shadow Creation: Use a matte product, typically two to three shades darker than your skin tone, to create shadows under your cheekbones, along your jawline, and on the sides of your nose.
- Highlighting: Apply a lighter, often shimmery, product to the high points of your face, such as the tops of your cheekbones, brow bone, bridge of your nose, and cupid’s bow.
- Blending: This is arguably the most critical step. Harsh lines are the enemy of natural contouring. Seamless blending ensures a smooth, believable transition between shades.
Understanding these basic principles sets a strong foundation for successful contouring, transforming a flat canvas into a three-dimensional masterpiece.
Choosing the Right Products and Tools
The market offers a vast array of contouring products, from creams and liquids to powders and sticks. Each has its advantages, and the best choice often depends on your skin type, desired finish, and ease of application. Creams and liquids tend to offer a more natural, dewy finish, ideal for drier skin, while powders are excellent for oily skin and provide a more matte look.
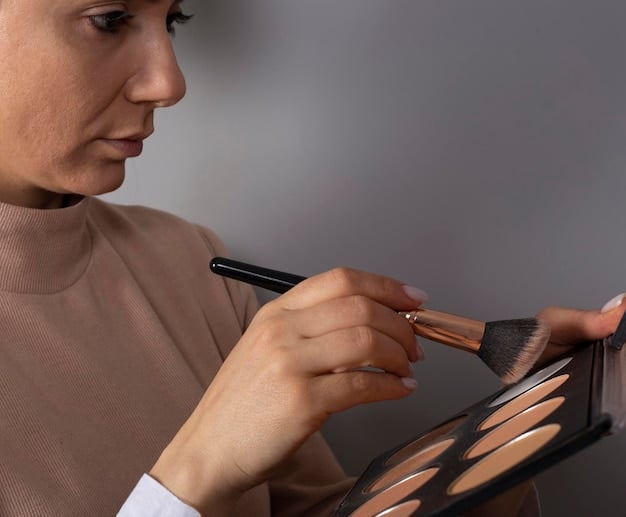
Equally important are the tools. Brushes come in various shapes and sizes, each designed for specific applications. A dense, angled brush is perfect for applying contour beneath the cheekbones, while smaller, fluffy brushes are ideal for precision work around the nose and eyes. Don’t forget a damp beauty sponge for seamless blending, especially with cream products.
Ultimately, the aim here is to provide a comprehensive guide that not only informs but also empowers you to experiment and find what works best for your individual needs. The journey of mastering contouring is a continuous learning process, but with the right knowledge and tools, you’re well on your way to sculpting your face like a true professional.
identifying your face shape for tailored contouring
Before you even pick up a brush, knowing your face shape is paramount. Just as a sculptor studies the block of marble, a contouring artist understands the unique contours of each face. Applying contouring techniques arbitrarily can lead to an unnatural or unbalanced look. Instead, by identifying your specific face shape, you can tailor your contour and highlight placement to enhance your inherent beauty.
There are generally five common face shapes: oval, round, square, heart, and long. While most faces are a blend of these, one shape usually dominates. Take a moment to examine your face in a mirror, noting the widest points, the shape of your jawline, and your hairline. This simple self-assessment is the first step toward customized contouring.

Tailoring Techniques for Different Face Shapes
Once you’ve identified your face shape, you can apply specific contouring strategies that work with your unique bone structure. The goal is often to create the illusion of an oval face, considered by many to be the most balanced and proportionate. However, the true art lies in enhancing your natural beauty, not concealing it.
- Oval Face: Considered ideal due to its balanced proportions. Contouring here is minimal, focusing on enhancing natural shadows just below the cheekbones and a touch on the forehead and jawline for added definition.
- Round Face: The goal is to add length and definition. Apply contour along the temples, under the cheekbones (extending towards the corners of the mouth), and along the jawline to slim and elongate the face. Highlight the center of the forehead, bridge of the nose, and chin.
- Square Face: Characterized by a strong, angular jawline. Contour along the outer edges of the forehead near the temples and heavily along the jawline to soften angles. Highlight the cheekbones, center of the forehead, and chin to draw attention to the center of the face.
- Heart Face: Features a wider forehead and a narrower chin. Contour the sides of the forehead near the temples and the tip of the chin to balance the face. Highlight under the eyes and along the jawline to create the illusion of a fuller lower face.
- Long Face: Aim to visually shorten the face. Apply contour along the hairline across the forehead and directly under the chin to reduce visual length. Contour the hollows of the cheekbones for width. Highlight under the eyes and on the apples of the cheeks.
Remember, these are guidelines, not strict rules. Experimentation is key to discovering what looks best on you. The beauty of makeup is its flexibility, allowing for endless possibilities to express and enhance your individuality. By understanding these tailored approaches, you’re better equipped to sculpt your face with confidence and precision.
step-by-step application: perfecting your contour
With an understanding of the basics and your face shape, it’s time to delve into the practical application. Achieving a flawless contour is a process that involves precision, patience, and a good blending technique. This section breaks down the application into manageable steps, ensuring you can replicate professional results at home.
Before you begin, ensure your skin is prepped. This means cleansed, moisturized, and perhaps primed to create an even canvas. Foundation and concealer should be applied prior to contouring, as they set the base for the shadows and highlights to seamlessly blend onto.
For beginners, cream or stick contours are often easier to work with because they offer more playtime before setting, making blending less rushed. Powder contours are great for setting cream products or for those with oily skin, offering a more matte finish.
Strategic Placement for Maximum Impact
The art of contouring lies in strategic placement. You’re not just drawing lines but creating illusions of depth and dimension. The most common areas for contour application include the hollows of your cheeks, along your jawline, the sides of your nose, and your temples. However, the precise placement will depend on your face shape, as discussed earlier.
- Cheekbones: Locate the hollows by sucking in your cheeks. Apply your contour product in a line from your hairline towards the corner of your mouth, stopping about two fingers’ width from your mouth.
- Jawline: For a sharper look, apply contour along the underside of your jawbone, extending from the ear down towards the chin. This creates a shadow that defines the jaw.
- Nose: To slim the nose, apply two thin lines of contour down the sides, starting from the inner corner of your eyebrows to the tip of your nose. Blend thoroughly.
- Temples/Forehead: For wider foreheads, apply contour along the hairline on the sides of your forehead. This helps to balance the upper part of your face.
Remember, the goal is subtle definition, not harsh lines. Start with a small amount of product and build up if necessary. It’s always easier to add more product than to remove excess.
The Art of Blending: Your Best Friend
Blending is the most critical step in contouring. Poor blending can result in visible streaks and an unnatural appearance, negating all your efforts. Think of blending as diffusing the color, seamlessly merging the contour shade into your foundation.
For cream and liquid contours, a damp beauty sponge or a dense buffing brush works wonders. Gently dab and buff the product into your skin using small, circular motions. Avoid dragging the product, which can lift your foundation. For powder contours, a fluffy, angled brush is ideal. Use light, sweeping motions to soften the edges and merge the color.
Always blend upwards and outwards when working on the cheekbones to create a lifted effect. For the jawline, blend downwards to create a natural shadow. Blend the nose contour meticulously, ensuring no harsh lines remain. Take your time with this step; it’s what truly transforms your contour from obvious lines to natural-looking sculpted features.
Once your contour is perfectly blended, you can set it with a translucent powder, especially in areas prone to creasing or excess oil. For a long-lasting effect, a setting spray can be applied at the very end of your makeup routine.
highlighting techniques: bringing light to your features
Contouring and highlighting are two sides of the same coin, working in tandem to create a harmonious sculpted look. While contouring recedes features, highlighting brings them forward, drawing attention to the high points of your face where light naturally hits. Neglecting highlighting means missing out on the full potential of a dimensional makeup look.
Choosing the right highlighter is as important as selecting your contour shade. Highlighters come in various forms: powders, creams, liquids, and sticks, with finishes ranging from subtle luminosity to intense shimmer. For a natural look, opt for a cream or liquid highlighter with fine shimmer particles. For a more dramatic effect, powdered highlighters deliver a stronger glow.
Strategic Areas for Illumination
Just like contour, highlight placement is key. Applying highlighter to the right areas enhances your bone structure and gives you a radiant, healthy glow. These are typically the areas you want to appear more prominent or catch the light.
- Cheekbones: Apply highlighter to the very top of your cheekbones, just above your contour. This creates a lift and makes your cheeks appear more defined.
- Brow Bone: A touch of highlighter under your eyebrow arch lifts the brow and brightens the eye area.
- Inner Corner of the Eye: A small dot of highlighter here instantly brightens your eyes and makes you look more awake.
- Bridge of the Nose: A thin line down the bridge of your nose can make it appear straighter and more refined. Avoid the tip if you want to shorten your nose.
- Cupid’s Bow: Applying a dab of highlighter on the cupid’s bow (the “M” shape of your upper lip) makes your lips appear fuller and more defined.
- Center of the Forehead/Chin: For some face shapes, a light touch in the center of the forehead or chin can add balance and dimension.
Apply highlighter with a light hand, building up the intensity if desired. A fluffy fan brush is excellent for powder highlighters, providing a diffused glow. For cream or liquid highlighters, use your fingertips, a damp beauty sponge, or a small dense brush for precise application.
Blending Highlight for a Seamless Glow
Just as with contour, blending is crucial for highlighter application. Harsh lines of shimmer can look unnatural and defeat the purpose of enhancing your features. The goal is a seamless, lit-from-within glow.
After applying your highlighter, gently tap or buff the edges with your finger, a clean brush, or a damp beauty sponge to soften any harsh lines. The highlighter should merge seamlessly into your skin and foundation, creating a natural radiance rather than a visible streak of glitter. If you’ve applied too much, a light dusting of translucent powder can help tone down the intensity.
Remember, less is often more when it comes to highlighter. A subtle glow can be far more impactful and sophisticated than an overpowering shimmer. By mastering both contouring and highlighting, you unlock the ability to truly sculpt your face, creating depth, dimension, and a radiant finish that enhances your natural beauty.
common contouring mistakes and how to avoid them
While contouring can be transformative, it’s also ripe for common pitfalls that can undermine your efforts. From choosing the wrong shade to improper blending, understanding these mistakes is the first step toward avoiding them and achieving a flawless look. Many believe that contouring is complex, but often, it’s merely a lack of awareness regarding these common errors.
Even seasoned makeup enthusiasts can fall victim to these blunders, which is why a critical self-assessment and consistent practice are key. Learning from mistakes, both yours and others, helps refine your technique and ensures a more natural and polished outcome.
Top Contouring Faux Pas
Navigating the world of contouring means being aware of the common errors that can make your otherwise impeccable makeup look less than perfect. These missteps often relate to product choice, application, and finishing.
- Too Dark or Too Warm/Cool a Shade: Using a contour shade that is excessively dark or has an incorrect undertone (too orange, too gray) will look unnatural and muddy. A true contour shade should mimic a natural shadow, which is typically a cool-toned brown.
- Unblended Lines: Harsh, visible lines are perhaps the most common and tell-tale sign of amateur contouring. Contouring should be subtle, creating definition without showing where the product starts or ends.
- Applying Contour in the Wrong Areas: Contouring is not a one-size-fits-all technique. Applying contour in areas that don’t align with your face shape’s needs can exaggerate features you wish to minimize or flatten ones you want to enhance.
- Over-Contouring: Applying too much product or applying it too heavily can make your face look overly sculpted or even dirty. A little goes a long way, and building up intensity is always preferable to starting with too much.
- Forgetting to Highlight: Contouring without highlighting is like drawing shadows without light. The two techniques work hand-in-hand to create dimension. Without highlight, the face can appear flat or even sunken.
By being mindful of these common mistakes, you can significantly improve your contouring game. It’s about precision, intention, and a careful hand, rather than just following a trend.
Tips to Ensure Flawless Results
Avoiding the pitfalls discussed above often comes down to some simple, yet effective, practices. Incorporating these into your routine will elevate your contouring skills from beginner to pro.
- Invest in the Right Tools: Good quality brushes and sponges make a significant difference in product application and blending. Clean your tools regularly to prevent bacterial buildup and ensure smooth application.
- Use Natural Lighting: Always apply makeup in good, natural light. This helps you see how the product looks in real-world conditions and ensures you don’t over-apply or leave harsh lines.
- Start Small, Build Up: Begin with a small amount of product and gradually add more if needed. This prevents over-application and makes blending easier.
- Check From Different Angles: After applying, view your face from various angles and in different lighting conditions (if possible) to ensure the contour looks seamless and natural from all perspectives.
- Practice Makes Perfect: Contouring truly is an art form that improves with practice. Don’t be discouraged by initial attempts. Experiment, learn from your results, and enjoy the process.
Mastering contouring is a journey, not a destination. By understanding possible missteps and implementing these corrective measures, you can ensure your sculpted look is always natural, flawless, and enhances your unique beauty.
maintaining your contoured look throughout the day
Achieving that perfectly sculpted look is one thing; making it last all day is another. Environmental factors, skin type, and everyday activities can all contribute to your meticulously applied contour fading or smudging. For many, longevity is as crucial as the initial application, especially for events or long workdays. Strategies for makeup longevity are not just about product choices, but also about application techniques and layering.
The key to a long-lasting contour lies in preparation, setting, and minimal touch-ups. Without these steps, the efforts you put into sculpting your face might dissipate long before the day is over. This section will guide you through effective methods to keep your contour sharp and defined from morning till night, ensuring your sculpted masterpiece withstands the test of time.
Setting Your Contour for Endurance
Once you’ve applied and blended your contour and highlight, setting them in place is crucial for longevity. This involves using powders and setting sprays that lock your makeup down, preventing smudging, creasing, and fading.
- Powder Layering (for Cream Contouring): If you’re using cream or liquid contour products, setting them with a powder contour of the same shade greatly enhances their staying power. Apply the powder lightly over the cream application with a fluffy brush, gently pressing it in. This technique creates a strong base and prevents the cream product from moving.
- Translucent Setting Powder: For areas where you’ve highlighted or want to control oil, a light dusting of translucent setting powder can make a world of difference. Apply it with a large, fluffy brush, focusing on the T-zone and any areas prone to shine. Be cautious not to disturb your contour.
- Setting Spray: This is your ultimate weapon against makeup meltdown. After all your makeup is applied, mist your face with a setting spray. Look for formulas designed for long-wear or matte finishes if you have oily skin, or hydrating ones if you have dry skin. Setting sprays create a protective barrier that seals your makeup in place, ensuring it lasts for hours.
The synergy between appropriate product choice and intelligent layering is what truly locks your contour into place. Don’t underestimate the power of these final steps in your routine.
Smart Touch-Ups and Considerations
While a good setting routine can significantly extend the life of your contour, sometimes touch-ups are inevitable. However, strategic and minimal touch-ups are key to avoiding a cakey or overly done appearance.
- Blotting Papers: Instead of adding more powder to combat shine, which can make your contour look heavy, use blotting papers. Gently press them onto oily areas to absorb excess oil without disturbing your makeup.
- Powder on the Go: If you really need a touch-up, carry a compact powder contour or a setting powder. Apply it sparingly to areas where your contour might have faded, blending well with a small, dense brush. Avoid applying more liquid or cream products over existing makeup as this can lead to patchiness.
- Consider Your Skin Type: Oily skin types might require more diligent setting and blotting throughout the day. Dry skin types might focus more on hydrating setting sprays and less on heavy powders to prevent a flat look.
- Weather and Environment: Humidity, heat, and even cold weather can affect makeup longevity. Adjust your setting routine based on the climate you’ll be in. Heavier setting is advisable for hot, humid conditions.
By following these methods, you can significantly prolong the life of your contoured look. It’s about being prepared and understanding the subtle nuances of makeup longevity, ensuring your sculpted features remain defined and fresh throughout your day.
advanced tips and tricks for sculpted perfection
Once you’ve mastered the basics of contouring and highlighting, the world of advanced techniques opens up, allowing for even greater sophistication and customization. These tips go beyond the fundamental applications, delving into nuanced approaches that can elevate your makeup artistry. This isn’t about radically changing your face, but rather refining your skills to achieve a truly seamless and professional finish.
These advanced methods often involve experimenting with different product textures, refining placement for unique features, and understanding how contouring interacts with other makeup elements. It’s about pushing boundaries while maintaining a natural and refined aesthetic.
Beyond Basic Contouring: Nuanced Techniques
To really take your contouring to the next level, consider these more refined approaches:
- “Baking” for Highlight Intensity: This technique involves applying a thick layer of translucent powder over cream highlight, letting it “bake” for 5-10 minutes, and then dusting it off. It offers an incredibly bright and long-lasting highlight, perfect for under-eye brightening or emphasizing cheekbones.
- Customizing Nose Contouring: Instead of a fixed straight line, customize your nose contour based on its unique shape. For instance, if you want to lift the tip, apply a small “U” shape of contour just above the nostril area. If your nose is wider at the bridge, apply contour closer together at that point.
- Lip Contouring: A subtle trick involves applying a tiny bit of contour immediately under the center of your bottom lip to create the illusion of a fuller pout. A touch of highlight on the cupid’s bow finishes this effect.
- Neck and Decolletage Contouring: For special occasions or photoshoots, extending contour along the neck and collarbones can create an overall more sculpted appearance, especially if wearing an open neckline.
- Strategic Eye Contouring: Beyond brow bone highlight, a light sweep of a cool-toned contour shade in the crease of the eyelids can add depth and make eyes appear larger and more defined, even without much eyeshadow.
These advanced tricks allow for greater control and personalization, turning contouring into a true art form. It’s about understanding the subtle interplay of light and shadow and applying that knowledge with precision.
Integrating Contouring with Your Full Face Makeup
Contouring should never exist in isolation. Its true magic is unlocked when seamlessly integrated into your overall makeup look. This means considering how your contour interacts with your foundation, blush, and even your eye makeup.
Ensure your foundation provides an even base for contour application. Cream contours work best over cream foundations, and powders over powder foundations, or set liquid/cream foundations. When applying blush, place it slightly above your contour on the apples of your cheeks and blend upwards towards the temples. This creates a harmonious gradient from contour to blush to highlight, creating a seamless transition that enhances your face’s natural curves.
Finally, remember that contouring is an enhancement, not a mask. The goal is to define and sculpt, making your features appear more pronounced and refined, not to drastically alter them. With practice, these advanced tips will empower you to create truly professional and personalized contoured looks that radiate confidence and sophistication.
| Key Point | Brief Description |
|---|---|
| 🎨 Shadow & Light | Contouring uses darks to recede features and lights to bring them forward, creating dimension. |
| ✨ Face Shape Matters | Tailor contour placement to your specific face shape for natural, enhanced results. |
| 🖌️ Blending is Key | Seamless blending avoids harsh lines, ensuring a natural and polished sculpted look. |
| 💧 Longevity Tips | Set with powder/spray, blot oil, and touch up subtly for all-day wear. |
frequently asked questions about contouring
Bronzer typically adds warmth and a sun-kissed glow to the face, often having a warmer, reddish undertone and sometimes shimmer. Contour, on the other hand, is used to create shadows and define features, usually having a cooler, more ashy undertone to mimic natural shadows. They serve distinct purposes in makeup application.
Yes, you absolutely can contour with only powder products. Powder contouring is excellent for oily skin types or for a more matte finish. It’s often easier for beginners as it offers less “playtime” before setting, making it simpler to blend. Ensure your foundation is set before applying powder contour for a smoother application.
Choose a contour shade that is about two to three shades darker than your skin tone and has a cool, grayish-brown undertone. This mimics natural shadows. Avoid shades that are too warm or orange, as they will look unnatural. Test shades on your jawline or cheek to see how they blend with your natural complexion.
While not strictly necessary, good, natural lighting is highly recommended for contouring. It allows you to see how the contour and highlight interact with your features in real-world conditions, helping you prevent harsh lines and over-application. Applying makeup in poor lighting can lead to an unnatural look once you step outside.
For optimal hygiene and makeup application, you should clean your contouring brushes at least once a week, especially if you use cream or liquid products. Regular cleaning prevents product buildup, ensures smooth blending, and minimizes the risk of bacterial growth, which can lead to skin issues.
conclusion
Mastering the art of contouring is a journey that blends understanding, technique, and practice. From identifying your unique face shape to strategic product placement and meticulous blending, each step plays a crucial role in achieving that coveted sculpted look. Remember, contouring is about enhancing your natural beauty, not masking it. With these techniques and a little patience, you’re well-equipped to sculpt your face like a true professional, radiating confidence and grace with every application.


